

How to Sew a Fitted Crib Sheet: Complete Step-by-Step Tutorial
Learning how to sew a fitted crib sheet is one of the most rewarding beginner sewing projects you can tackle. Whether you are nesting for a new arrival, coordinating nursery bedding with custom fabric, or listing handmade sheets in your Etsy shop, this tutorial walks you through every cut, seam, and elastic detail to produce a professional-quality fitted crib sheet that fits snugly and safely.
Note: This tutorial is written for a standard full-size U.S. crib/toddler mattress, commonly around 28" × 52". Per the Consumer Product Safety Commission's mandatory safety standard (ASTM F2933-21, codified at 16 CFR part 1241), full-size crib mattresses must measure at least 27¼" wide × 51⅝" long with a maximum thickness of 6". Before you begin, measure your own mattress — depths vary — and adjust the corner square size if needed.
Why Make Your Own Crib Sheets?
Store-bought crib sheets are often limited to a handful of mass-produced prints. When you sew your own, you control every element: fabric quality, pattern selection, seam finish, and fit. Handmade crib sheets also make thoughtful baby shower gifts and high-demand Etsy listings, especially when paired with coordinating items like burp cloths or bibs.
Most importantly, the CPSC advises that crib sheets must fit snugly on the mattress and overlap the edges so the sheet cannot be dislodged by pulling on the corner (CPSC Crib Sheet Safety Alert, Publication 5137). When you make your own, you can test the fit and adjust the elastic tension to ensure a safe, secure fit.
Fabric Recommendations
Quilting cotton is the most popular choice for crib sheets. It is breathable, durable, comes in thousands of prints, and holds its shape after washing. Cotton flannel is ideal for cooler climates — it is soft, warm, and gets cozier with each wash. Seersucker offers a textured, puckered surface that is naturally breathable and requires minimal ironing. All three are excellent choices when the finished sheet fits snugly and securely on the mattress.
Avoid stretchy knit fabrics unless you are experienced with sewing knits, as they can create loose-fitting sheets that pose a safety risk.
Before You Cut: Sizing Notes
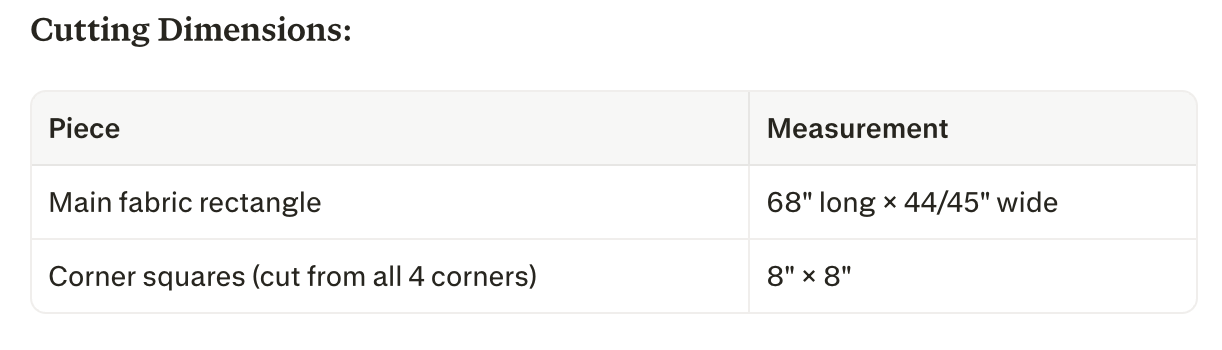
The standard fabric cut size for a fitted crib sheet is 68" long × 44/45" wide — the natural width of most quilting cotton. This is the consensus measurement used across multiple sewing tutorials (See Kate Sew, I Can Sew This, WeAllSew, Made Every Day).
Here is why: a standard crib mattress is roughly 28" × 52" × 5–6" thick. The fabric needs to cover the top surface, wrap down both sides, and tuck under the mattress. An 8" corner square accommodates a mattress depth of 5–6" plus about 2" of under-mattress wrap.
The Sizing Formula
If your mattress has a different depth, use this formula to calculate your cut size:
Fabric Width = Mattress Width + (2 × Mattress Depth) + (2 × Under-Wrap Allowance)
Fabric Length = Mattress Length + (2 × Mattress Depth) + (2 × Under-Wrap Allowance)
Corner Square Size = Mattress Depth + Under-Wrap Allowance
For a standard 28" × 52" × 5" mattress with a 3" under-wrap:
Width: 28 + (2 × 5) + (2 × 3) = 44"
Length: 52 + (2 × 5) + (2 × 3) = 68"
Corner square: 5 + 3 = 8"
This confirms the standard 44" × 68" cut with 8" corner squares.
Step-by-Step Assembly Guide
Step 1: Pre-Wash and Prepare Your Fabric
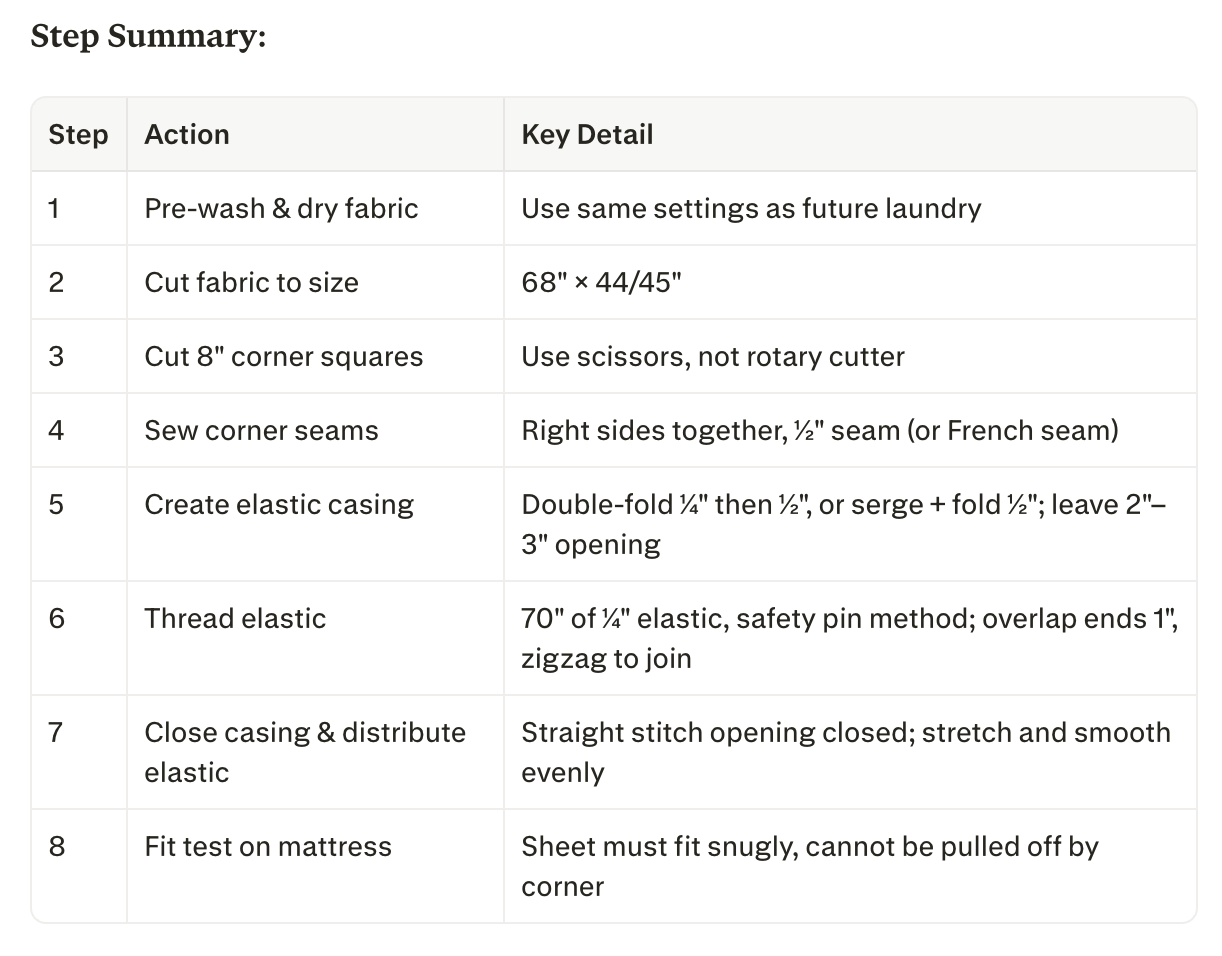
Wash and dry your fabric on the same settings you will use for the finished sheet. Cotton shrinks when washed, and pre-washing ensures your measurements stay accurate after the first wash. Iron out any major wrinkles before cutting.
Why this matters: The CPSC's own crib mattress testing protocol requires sheets to be washed and dried on high heat at least twice before testing mattress compression and fit (CPSC Final Rule, ASTM F2933-21). Pre-washing your fabric mimics real-world conditions.
Step 2: Cut the Fabric to Size
Lay your pre-washed fabric flat on your cutting surface.
If using 44/45" wide quilting cotton, leave the width as-is — you may keep the selvage on for maximum width, as it will be hidden inside the elastic casing.
Measure 68" along the length and cut a straight line across using your rotary cutter and ruler, or fabric scissors.
Finished cut piece: 44/45" wide × 68" long.
Step 3: Cut the Corner Squares
This is the step that transforms a flat rectangle into a fitted sheet shape.
Fold your fabric in half lengthwise (selvage to selvage), then fold in half again crosswise. You should now have all four corners stacked on top of each other.
At the corner where all four layers meet (all raw edges), measure 8" from each edge using your clear quilting ruler.
Mark an 8" × 8" square with your fabric marking pen.
Use fabric scissors (not a rotary cutter) to cut out the square through all four layers. Scissors give you more control at the inside corner and prevent accidental over-cutting into the main body of the fabric.
When you unfold the fabric, you will see four 8" × 8" notches removed — one from each corner. Your fabric now has a cross shape, like a plus sign with a rectangular center and four side flaps.
Step 4: Sew the Corner Seams
The corners are what give the sheet its three-dimensional "pocket" shape that wraps around the mattress corners. You have two options:
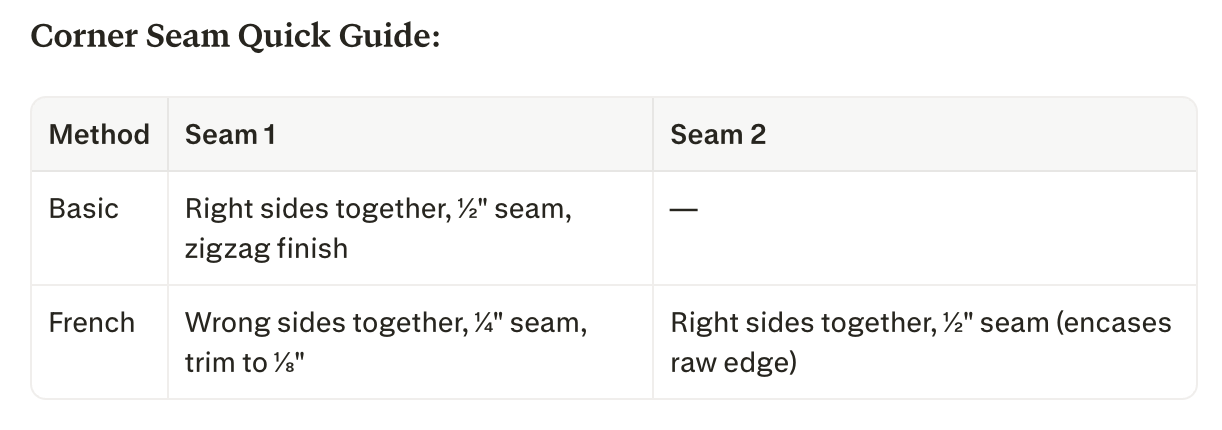
Option A: Basic Seams (Beginner-Friendly)
Working with one corner at a time, bring the two cut edges of the 8" notch together with right sides facing.
Pin along the 8" seam.
Sew with a straight stitch and a ½" seam allowance. Backstitch at both the beginning and end.
Finish the raw edge with a zigzag stitch or serger to prevent fraying.
Press the seam to one side.
Repeat for all four corners.
Option B: French Seams (Professional Finish)
French seams enclose all raw edges for a clean, durable finish — ideal for items that will be washed frequently.
Bring the two cut edges of each corner together with wrong sides facing (this feels backwards, but it is correct for French seams).
Sew a scant ¼" seam along the 8" edge. Backstitch at both ends.
Trim the seam allowance to about ⅛".
Fold the corner so right sides are now together, encasing the first seam inside.
Press flat.
Sew a ⅜" to ½" seam along the folded edge. This encloses the raw edge completely.
Press the seam to one side.
Repeat for all four corners.
French seam tip: The finished seam should be fully enclosed with no visible raw edges when you turn the sheet right-side out. This construction method is commonly used in high-quality, frequently washed textiles.
Step 5: Create the Elastic Casing
The casing is the channel that holds the elastic around the perimeter of the sheet. You can finish the edge and create the casing in a single process using a double-fold method, or finish the edge separately first if you prefer.
Option A — Double-Fold Casing (All-in-One, No Serger Required):
Fold the raw edge of the entire perimeter under ¼" and press with your iron.
Fold under an additional ½" and press again. The raw edge should be fully enclosed inside this double fold.
Pin or clip the fold in place every few inches.
Sew around the entire perimeter with a straight stitch, stitching close to the inner folded edge of the casing — about ⅜" from the outer fold.
Option B — Serge First, Then Single-Fold Casing:
Run a 3- or 4-thread serger stitch around the entire raw edge to finish it.
Fold the finished edge under ½" and press.
Pin or clip in place.
Sew around the perimeter with a straight stitch close to the folded edge.
For both methods:
Leave a 2"–3" opening in the casing. Do not sew this section closed — you will thread the elastic through it. Mark the opening with two pins or clips so you do not accidentally sew past them.
Casing width check: Your finished casing should be about ½" wide — just wide enough for ¼" elastic to slide through smoothly without bunching.
Step 6: Thread the Elastic
Cut your elastic to 60–72". Start with 70" and adjust for snugness after fitting. The CPSC requires crib sheets to fit snugly and overlap the mattress so they cannot be dislodged by pulling on the corner (CPSC Publication 5137), so aim for snug, secure tension without compressing, curling, or distorting the mattress.
Attach a safety pin to one end of the elastic.
Pin the other end of the elastic to the casing opening so it does not get pulled inside.
Thread the safety pin through the casing, gathering the fabric as you go. Work the elastic all the way around the perimeter until it emerges from the other side of the opening.
Overlap the two elastic ends by about 1" and sew them together securely with a zigzag stitch — stitch back and forth several times to reinforce.
Elastic length note: Different elastics stretch differently. Test your elastic's recovery before cutting — it should snap back to its original length after stretching. If it stays stretched, it will not hold the sheet snug over time.
Step 7: Close the Casing and Distribute Elastic
Sew the 2"–3" opening closed with a straight stitch, matching the existing stitching line.
Hold the sheet at two opposite points and stretch. The fabric should gather evenly.
Work your way around the sheet, stretching and smoothing, to distribute the elastic evenly around the entire perimeter.
Optionally, stitch a small stay stitch (3–4 back-and-forth stitches) at each corner seam to anchor the elastic and prevent it from shifting during washing.
Step 8: Final Fit Test
Place the sheet on your crib mattress and check:
The sheet covers the top surface completely with no gaps.
The corners wrap snugly around each mattress corner.
The elastic edge tucks under the mattress with at least 1–2" of overlap on all sides.
You cannot pull the sheet off the mattress by tugging on a corner.
If the sheet is too loose, open the casing, shorten the elastic by 2–3", rejoin, and re-close. If it is too tight to stretch over the mattress, add a few inches of elastic.
Pro Tips for Clean, Professional Corners
1. Cut Corners with Scissors, Not a Rotary Cutter
Rotary cutters are great for straight lines but can over-cut at the inside corner of your 8" square. Fabric scissors give you precise control at the pivot point, ensuring a clean 90-degree angle that translates to a crisp corner seam.
2. Use French Seams for a Wash-Ready Finish
Crib sheets go through the laundry constantly. French seams enclose raw edges inside a double-stitched pocket, preventing fraying even after hundreds of wash cycles. This is the same construction used in high-end commercial sheets.
3. Press Every Seam
Pressing is not optional — it is what separates homemade from handmade. Press each corner seam open or to one side before moving to the next step. Pressed seams lie flat, reduce bulk at corners, and make the casing step significantly easier.
4. Mark Your Casing Opening with Double Pins
Place two pins close together at your intended opening. When you reach the first pin, stop and backstitch. Skip to the second pin and resume sewing. This creates a visible, consistent gap that is easy to find when threading elastic and easy to close later.
5. Anchor Elastic at Each Corner
After threading and joining the elastic, stitch a 1" vertical line of reinforcement at each corner seam through the casing. This prevents the elastic from shifting or bunching in one area and keeps the tension even around all four corners.
6. Use Knit Elastic if Stitching Through It
If you plan to topstitch the elastic in place (corner-only method), use knit elastic rather than braided. Knit elastic tolerates needle penetration without losing stretch recovery. Braided elastic can weaken when stitched through directly (WeAllSew).
7. Pre-Wash Fabric Twice for Maximum Shrinkage Control
Cotton can continue shrinking through the first several washes. Washing and drying your fabric twice before cutting helps ensure your finished sheet will maintain a snug fit after repeated laundering.
Fitted Crib Sheet — Quick Reference
Fits: Standard U.S. crib mattress (27¼" × 51⅝" × up to 6" thick) Materials Checklist:
☐ 2 yards of 44/45" wide 100% cotton fabric (pre-washed)
☐ 70" of ¼" wide elastic
☐ Coordinating polyester thread
☐ Straight pins or Wonder Clips
☐ Safety pin
☐ Clear quilting ruler (8" square minimum)
☐ Fabric scissors ☐ Iron and ironing board
☐ Sewing machine (able to do straight + zigzag stitch)
Link to fabric: https://www.spoonflower.com/en/artists/fabric/22890190
Safety Reminder: Crib sheets must fit snugly and overlap the mattress edges. Never use a sheet that can be dislodged by pulling on the corner. Never use adult sheets on a crib mattress.
Sources: CPSC Crib Mattress Safety Standard, CPSC Crib Sheet Safety Alert (Pub. 5137), CPSC Crib Safety Tips, See Kate Sew, I Can Sew This, WeAllSew, Made Every Day